Buyback Locker Setup Guide (from zero to production)
- Prerequisites: The buyback locker hardware registered in KEYVOX
- Time: 60–90 min (activating the buyback form takes a few business days after you ask support)
- Next: Locker Management Help (the locker settings screen is shared with the coin locker; buyback-only is a switch on it)
This page covers: the buyback locker (a locker where sellers deposit items for appraisal). For the cashless coin locker that holds luggage, see Locker Management; for delivery lockers, see Delivery Management.
This is the scenario-format setup manual for the UnlockOS Buyback Locker feature. If you're responsible for buyback reception, follow this page top-to-bottom.
Overall flow (8 steps)
Follow the order below — steps 1–4 have dependencies so complete them sequentially.
| # | Step | Required / Optional | Time | Depends on |
|---|---|---|---|---|
| 1 | KEYVOX integration (register the buyback locker hardware) | Required | 10 min | — |
| 2 | Business hours setup | Required | 5 min | — |
| 3 | Activate the buyback form (request via support) | Required | request → a few business days | — |
| 4 | Create locker config with "Buyback only" ON | Required | 10 min | 1, 3 |
| 5 | Configure notification channels (SMS / voice / email) | Required | 15 min | — |
| 6 | Print & apply the QR sticker on the locker | Required | 10 min | 4 |
| 7 | End-to-end test (customer + store flows) | Required | 20 min | 1–6 |
| 8 | Go live (notify staff, clean up test requests) | Required | 5 min | 7 |
Total: 60–90 minutes for one facility with one locker.
Step 1: KEYVOX integration (register the locker hardware)
Goal
Let UnlockOS remotely unlock the buyback locker (smart-lock enabled). The one-time QR/PIN issued during the buyback flow drives the physical unlock through KEYVOX.
Prerequisites
- A KEYVOX account
- The locker hardware is already registered on the KEYVOX dashboard for the target facility (Place), with at least one Box (deposit slot). The hardware manufacturing, delivery, and KEYVOX registration must be completed before setup.
Steps
- Main app → left menu → App Integrations
- Top tab → KEYVOX
- Click Log in with KEYVOX and complete OAuth
- Confirm registered locker devices are listed per Place
- Verify the target buyback locker appears (UnitID / LockID visible)
Verify
- The "KEYVOX Lock System" card shows the Connected badge (green)
- The locker device and its Boxes (deposit slots) are visible under the facility's Place
Door locks vs. locker devices: KEYVOX treats room door locks and lockers (multi-box units) as different device types. Buyback uses the locker device. If it doesn't appear, check the registration type on the KEYVOX dashboard.
Step 2: Business hours setup
Goal
Buyback assumes staffed operation (assessment after deposit), so reception is gated to business hours. Outside hours, the customer landing shows "reception closed" and submissions are rejected.
Steps
- Main app → left menu → Basic Settings
- In the Facility Basic Settings tab, fill in Business Hours for weekdays / holidays
- If 24-hour reception is desired, toggle 24 hours ON
- Save
Why the hours gate: Buyback is a same-day / next-business-day process (deposit → assessment → callback). Overnight deposits sit unattended, so UnlockOS blocks reception outside hours automatically. This differs from normal locker rental (24-hour possible).
Step 3: Activate the buyback form
Goal
Enable the customer-facing buyback request form (4 fields: kanji name, kana name, mobile phone, item count) for the target facility. The field set is fixed to these 4 items (changing fields would break identity verification and notification flow).
Prerequisites
- The target facility is registered in UnlockOS
Steps
Buyback form activation for a facility is handled by support at initial setup. Please contact support with:
- Target facility name (and facility ID if you have it)
- Desired reception-start date
After support activates the form, you can proceed with Step 4 onward.
Verify
- In Step 7, the customer form displays the 4 fields (kanji name, kana name, mobile phone, item count)
Field customization requests: Currently fixed at 4 fields. Additions require coordinated updates to notification templates and UI layout — please contact support in advance.
Step 4: Create locker config with "Buyback only" ON
Goal
Wrap the KEYVOX locker (linked in Step 1) as a buyback-only configuration in UnlockOS. Saving this configuration automatically produces the share URL — the landing URL for the entire buyback flow.
Prerequisites
- Step 1 (KEYVOX) done
- Step 3 (buyback form activated) done
Steps
- Main app → left menu → Lockers → Locker Config
- Top-right → New
- Enter a name (e.g. "Shibuya store — Buyback", any label that helps you identify it)
- Leave the Active toggle ON
- Turn "Buyback only (disable rental)" toggle ON
- Choose Unlock key type — enabling both QR and PIN is recommended so customers on any device can proceed
- Pick the KEYVOX locker device (from Step 1) in the KEYVOX Locker dropdown
- The size row (label + rate) does not participate in buyback pricing but at least one row is required; label it "Buyback box" or similar
- Save
- In the edit view, copy the Buyback share URL from the URL panel
Verify
- The locker config list shows the new config with Active + Buyback-only badges
- The buyback share URL is issued
- Opening the copied URL shows the buyback landing screen with the "Buyback Reception" title
What "disable rental" means: With Buyback-only ON, this config's URL accepts buyback flow only. If you also want to use the same physical locker for regular short-term rental, create a separate config with buyback-only OFF, and manage two URLs / QR codes separately.
URL doesn't switch to the buyback flow? The Buyback-only toggle was probably OFF at save time. Reopen the edit view and confirm the toggle state.
Step 5: Configure notification channels
Goal
Reliably deliver the one-time unlock QR + PIN to the customer after form submission. Delivery uses SMS (primary) + auto-voice (fallback if SMS fails) + email (if the customer provided one).
Prerequisites
- A Twilio account (under your own contract) if you want to use SMS / auto-voice
- The
card_twilio_smsfeature flag enabled for the target facility — without it, the Twilio card won't appear in the integrations hub. Ask support to enable it. - Email delivery works out of the box — no additional setup required
Steps
- Open App Integrations from the main-app left menu, then select the External Integrations tab
- Click the "SMS / Voice (Twilio)" card
- If the card isn't shown, confirm the
card_twilio_smsfeature flag is enabled for the target facility (ask support)
- If the card isn't shown, confirm the
- On the Twilio settings screen (
/integrations/twilio-sms), enter the following and Save:- Account SID — your Twilio console Account SID (starts with
AC) - Auth Token — your Twilio console Auth Token (stored encrypted; required on first save only, thereafter enter only to change it)
- From number — an E.164 phone number (
+81...) or a Messaging Service SID (MG...)
- Account SID — your Twilio console Account SID (starts with
- Press Test connection and confirm it shows "Connection successful"
- After saving, confirm the card badge turns to "Connected"
About usage costs: SMS / call charges are billed directly to your Twilio contract, keeping operating costs transparent. You may need to register a Japan-domestic sender (phone number / Messaging Service).
Verify
- SMS arrives at the registered mobile, its link renders the unlock QR
- If SMS is undelivered, auto-voice reads out the PIN
Identity verification model: Buyback presumes a follow-up call (appraisal). We don't require a separate auth-code entry — successful SMS delivery to the given number is itself the verification. If SMS fails, auto-voice reads out the PIN; if that fails, the customer may continue with the "Phone Unverified" badge after acknowledging. After 3 consecutive undelivered reports, auto-resend stops and we hand off to on-site staff.
Step 6: Print & apply the QR sticker on the locker
Goal
Produce the entrance QR sticker — the first thing a customer scans at the locker — from the buyback share URL, and place it on the hardware.
Steps
- Generate a QR image from the buyback share URL (any QR tool)
- Print as a weather-resistant sticker, roughly 8cm × 8cm on a high-contrast background
- Apply at eye level, visible from a distance, ideally with a small caption ("Scan here to start")
- Add on-site signage: consent notice, expected wait time, etc.
Verify
- Real device scan opens the buyback landing (covered by Step 7)
Re-stickering on URL change: Changing the facility slug or recreating the locker config changes the URL and invalidates existing stickers. Avoid URL changes after go-live — settle the shape during testing before printing at scale.
Step 7: End-to-end test (customer + store flows)
Goal
Verify both the customer flow (scan → deposit) and the store flow (arrival notice → remote unlock) on real hardware. Complete this before broadcasting to customers.
Prerequisites
- Steps 1–5 done
- The QR sticker (Step 6) is applied to the locker
- Test locker hardware + connectivity is available
7-1. Customer flow
Scan the sticker QR with a phone → landing opens
Check consent → tap "Start buyback"
Fill the 4-field form (kanji, kana, phone, count); email is optional
Submit → the completion screen appears
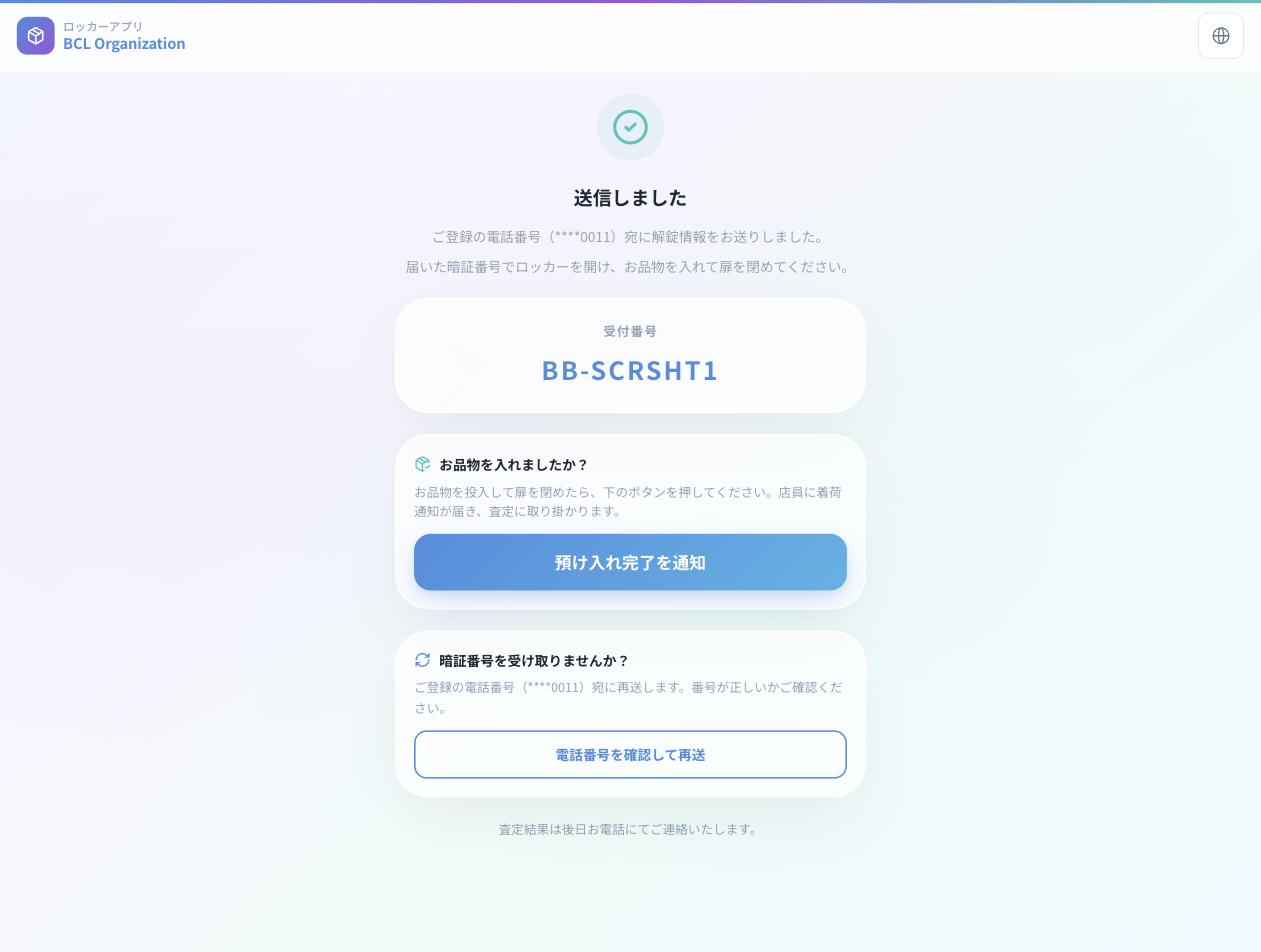
Verify the delivered unlock key (SMS or email) contains the QR + PIN + receipt code (
BB-XXXXXXXX), and that the QR does not appear on the original page (for security)Unlock the locker with the QR or PIN on the real device
Open and close the door (an empty box for testing is fine)
Return to the phone completion screen → tap "Notify deposit complete" → tap "Notify" in the confirmation modal → screen switches to the "Store staff have been notified" state
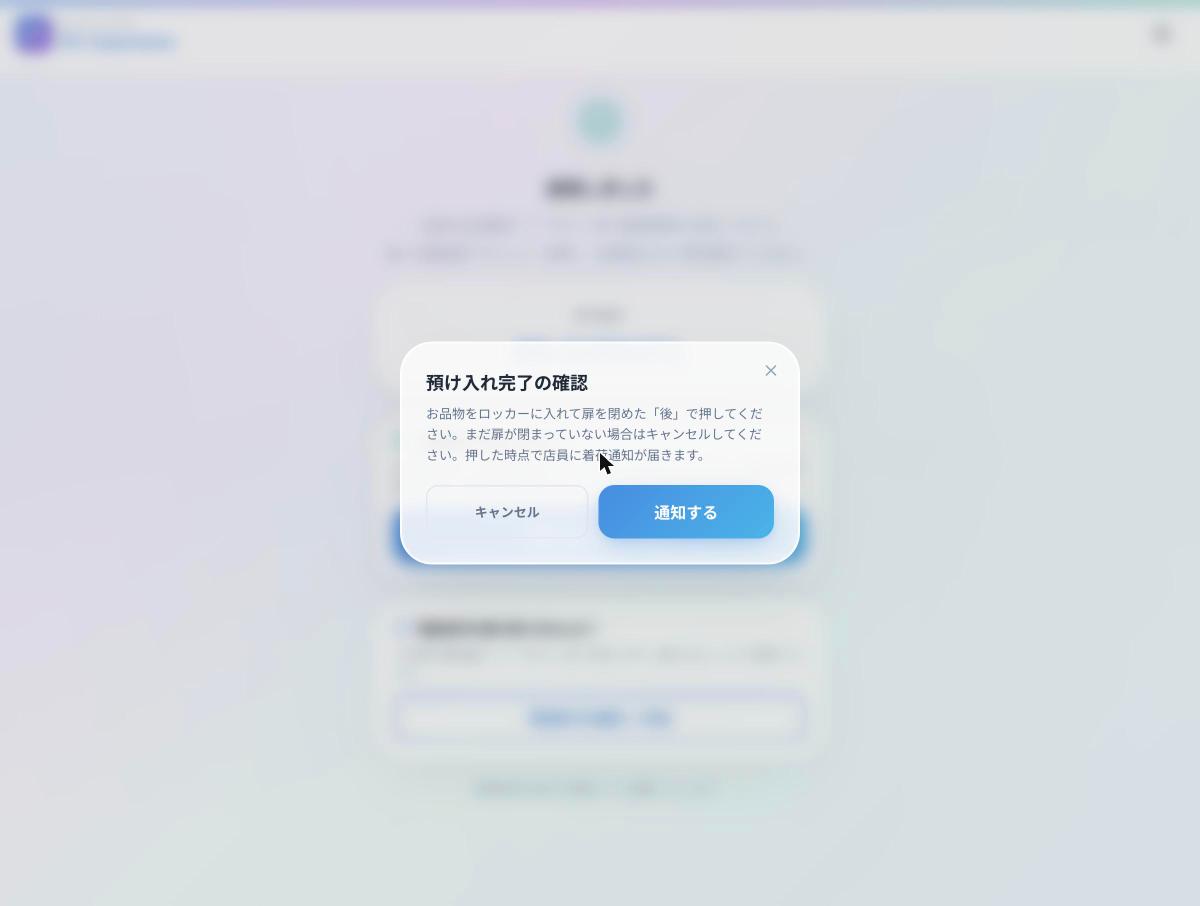
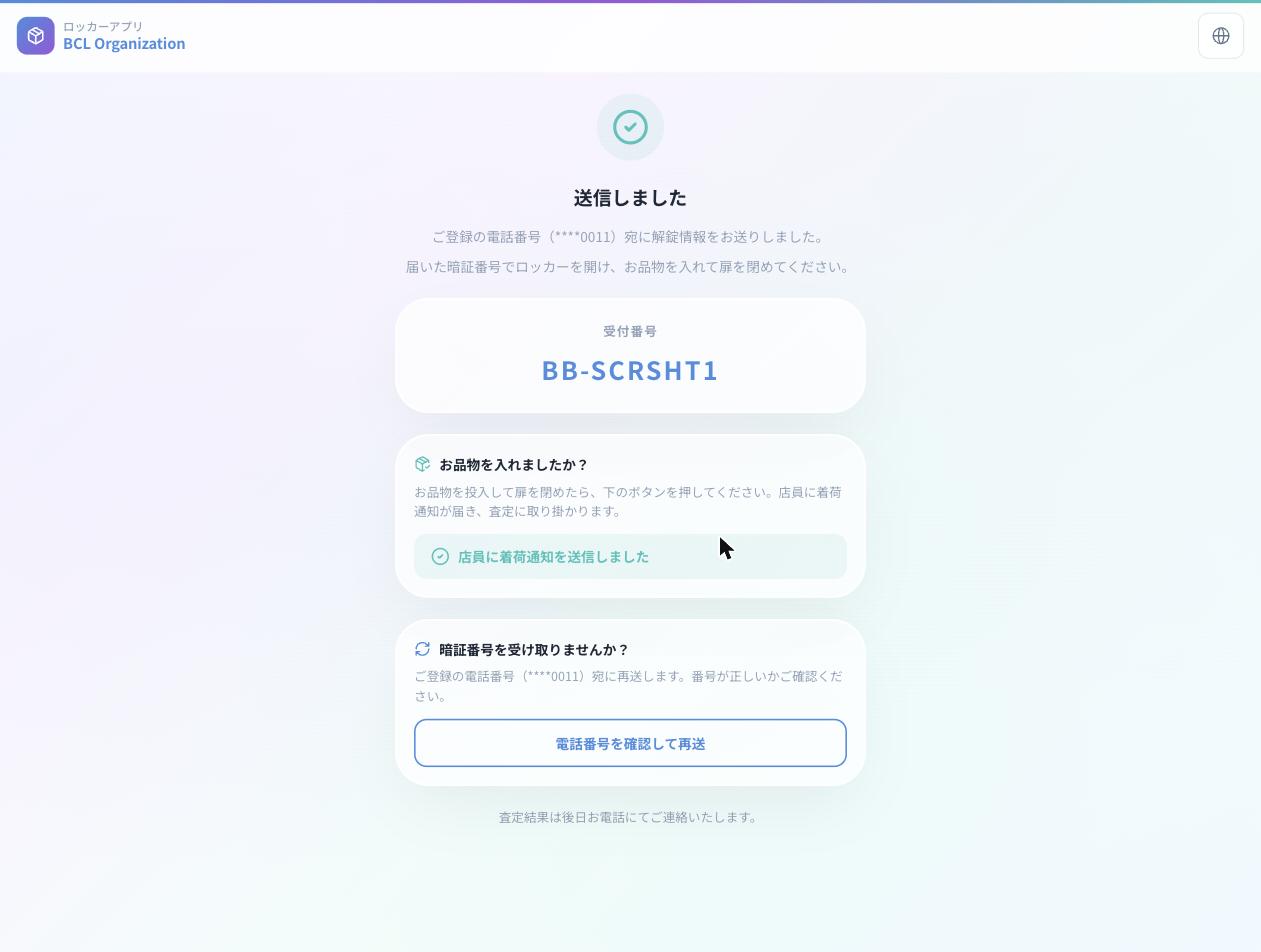
About the "Notify deposit complete" button: For now, the customer taps this button after closing the door. Automatic locker-side detection is planned; once available, the arrival notification will fire automatically.
7-2. Store flow
- When the seller taps "Notify deposit complete" in 7-1, the request status transitions to "Deposited"
- Main app → left menu → Lockers → Orders
- The test buyback shows up as a buyback locker order in the list
- Open the order detail:
- The Buyback Info section shows the kana name and item count
- Receipt code (
BB-XXXXXXXX) and masked phone (****XXXX) are shown
- The arrival notice email arrives for active facility staff
- Click Remote unlock in the detail view — the real door opens (for assessment retrieval)
If the seller forgets to tap the button: Store staff should sweep Lockers → Orders a few times a day, looking for entries in the "Awaiting deposit" state. This sweep becomes unnecessary once locker-side automatic detection is available.
7-3. Exception cases (recommended)
- Open the landing URL outside business hours → "Reception closed" appears
- Tap Resend after submission → the same QR/PIN redelivers (no new key)
- Tap Resend three times → the request is treated as "Phone Unverified" and the flow switches to the store-handoff variant (customer-facing message changes)
Verify
| Item | How to check |
|---|---|
| Landing opens | QR scan |
| 4 form fields render correctly | Form screen |
| Unlock key is delivered | Registered phone / email |
| QR / PIN unlocks the real device | Actual locker |
| "Notify deposit complete" transitions the order to Deposited | Order detail |
| Button press triggers arrival notification | Store staff email |
| "Buyback info" appears in order detail | Main app |
| Remote unlock opens the real door | Main app + on-site |
After the test
- Delete the test order from the order list
- Screenshot the delivered unlock content for internal share / customer-education material
Step 8: Go live
Goal
Once the test succeeds, prepare to accept live customer requests.
Steps
- Re-confirm that Step 5 notification channel (SMS / email) settings are production-worthy
- Brief store staff on:
- On-the-spot help when customers get stuck at the locker
- Handling requests with the "Phone Unverified" badge
- Remote unlock (PC and phone)
- Final check of customer-facing signage (QR position, terms of use, expected wait time)
- Staged rollout recommended — accept a few requests in a low-traffic morning window first, then ramp up
Verify
- The first live request completes without issue
- Arrival notification reaches the production ops team
Setup completion checklist
Once every mandatory item is checked, you're ready to go live.
Required
- KEYVOX shows Connected
- Buyback locker device registered on KEYVOX with ≥1 Box
- Business hours configured (reception gate)
- Buyback form activated for the target facility
- Locker config created with Buyback-only ON and a KEYVOX locker selected
- Buyback share URL is issued
- Notification channels (SMS / email) configured
- QR sticker applied to the locker
- End-to-end test succeeded (customer + store)
- Store staff briefed
Optional
- Twilio account (SMS / voice) ready — if using SMS / voice
- Terms-of-service copy posted on-site
Common gotchas
Q: The landing screen says "Buyback is not configured for this facility"
Step 3 (buyback form activation) may not be complete. Please contact support.
Q: "Reception closed" appears at form submit
Check that Step 2 business hours are set for the target facility and that the current time is within hours. Enable the 24-hour toggle if 24-hour reception is desired.
Q: The unlock key doesn't arrive
Check in this order:
- The customer's phone number / email is entered correctly
- Not routed to the spam folder
- Try the "Resend" button (up to 3 times) to re-deliver the same key
- If it still doesn't arrive, contact support
Q: The share URL stays on the normal rental URL and doesn't switch to buyback
The Buyback-only toggle was probably OFF at save in Step 4. Reopen the config, confirm it's ON, and verify the "Buyback-only" badge appears on the config card.
Q: The KEYVOX dropdown doesn't show the locker
Check in order:
- KEYVOX connection is Connected (Step 1)
- The locker device is registered under the target facility's Place on the KEYVOX dashboard
- Device type is Locker (multi-box), not door lock — door locks won't appear here
Q: "Notify deposit complete" was pressed but no arrival notification arrives
Check:
- The phone screen shows the green "Store staff have been notified" chip after pressing (if not, try again)
- Check the store notification inbox (including spam)
- At least one active facility staff member is registered
- If it still doesn't arrive, contact support
Q: "The unlock key has expired" when tapping the button
The button stops accepting the receipt >60 minutes after the unlock key was issued (anti-abuse). In that case, please ask an on-site staff member — they can confirm arrival and remote-unlock via the admin.
Q: Arrival email doesn't reach store staff
Check that the target facility has at least one active member registered. If members are zero or all disabled, notifications have nowhere to go. Manage members from the Member Management menu.
Q: How to handle a request with the "Phone Unverified" badge
The customer reported non-delivery 3× in a row. Auto-resend stopped and the flow handed off to on-site staff. Use remote unlock via the admin to hand the key over directly, or confirm / update the phone via the resend modal.
Support
If this guide doesn't resolve your issue, contact support with which step and what happens (screenshots of any error, timestamps, facility, and the receipt code BB-XXXXXXXX if available). "It doesn't work" alone slows down root-cause analysis.
Last updated: 2026-11-20 - Stated at the top which locker this page covers (cashless coin locker / buyback / delivery) (#6198)